- Table of contents
1. Benefits
- Reply to website inquiries directly from Planio using the Help Desk App.
- Don't let inquiries slip through the cracks in your overloaded email inbox.
- Work as a team on customer support.
- Become more efficient by using auto-replies and Help Desk templates.
- No need for server-side scripting to handle the contact form submissions.
2. HTML Form
You can send HTML form requests directly to Planio, as Planio will accept an unauthenticated POST request with application/x-www-form-urlencoded form data.
Therefore, we’re going to build a simple form with an action attribute that submits the form to Planio via the HTTP POST method.
<form action="https://example.plan.io/helpdesk" method="POST">
You will have to replace example.plan.io with your own Planio domain.
Then, we’ll add input fields for a name, email, email subject, and the description:
<label for="name">Your name:</label>
<input name="name" id="name" type="text" />

<label for="mail">Your email address:</label>
<input name="mail" id="mail" type="email" />

<label for="subject">Subject:</label>
<input name="subject" id="subject" type="text" />

<label for="description">Your message:</label>
<textarea name="description" id="description"></textarea>
A Planio account can have multiple projects, so we need a way to assign this message to a particular project in Planio. Therefore, we’ll add a hidden input field with the value set to the identifier of the project you want to forward the issue:
<input name="project" type="hidden" value="example-project" />
Please note: The field needs to be set to the project identifier, not the project name (e.g. help-desk instead of "Help Desk").
Then, we add a submit button:
<input type="submit" value="Submit request" />
3. Add a Honeypot Field
Forms are frequently the target of spambots that send messages to any form they can find online. One strategy for dealing with spam bots is to add an additional input field to the form called a honeypot field. Then, you hide the form field using CSS. If that input field is filled out, which spambots usually do, then the message is discarded as spam - hence the name honeypot field.
Here’s the honeypot field along with some CSS:
<style type="text/css">#url { display:none; }</style>
<input name="url" id="url" type="text" />
Using a honeypot field is optional but we highly recommend it to avoid spam.
4. Submit the form using Ajax
After receiving your contact form data, Planio will redirect back to the page it came from. This works nicely in many cases, but you might want to display a short "Thank you" message to your users once the form is submitted instead and make the form appear a little more snappy.
Here's one way to achieve that with an Ajax call using jQuery:
<p class="thanks" style="display:none;">Thank you for getting in touch.</p>
<p class="error" style="display:none;">Something went wrong. Please try again.</p>

<script src="https://code.jquery.com/jquery-3.1.1.min.js"></script>
<script type="text/javascript">
  $(function() {
    $('form').submit(function() {
      $.ajax({
        url: $(this).attr('action') + '.json',
        method: 'post',
        dataType: 'json',
        data: $(this).serialize(),
        success: function () {
          $('form').hide();
          $('.thanks').show();
        },
        error: function () {
          $('.error').show();
        }
      });
      return false;
    });
  });
</script>
5. A Practical Example
So, pulling it all together, a full HTML page including our form would look like this:
<!doctype html>
<html lang="en">
  <head>
    <title>Contact us!</title>

    <style type="text/css">
      body { font-family: sans-serif; margin: 2em; }
      label, input, textarea {
        width: 15em;
        float: left;
        margin-bottom: 1em;
        font-size: 1.2em;
      }
      label, input[type=submit] { width: 10em; clear: left; }
      #url, .thanks, .error { display: none; }
    </style>

    <script src="https://code.jquery.com/jquery-3.1.1.min.js"></script>
    <script type="text/javascript">
      $(function() {
        $('form').submit(function() {
          $.ajax({
            url: $(this).attr('action') + '.json',
            method: 'post',
            dataType: 'json',
            data: $(this).serialize(),
            success: function () {
              $('form').hide();
              $('.thanks').show();
            },
            error: function () {
              $('.error').show();
            }
          });
          return false;
        });
      });
    </script>
  </head>

  <body>
    <h1>Contact us!</h1>
    <form action="https://example.plan.io/helpdesk" method="POST">
      <p class="error">Something went wrong. Please try again.</p>
      <label for="name">Your name:</label>
      <input name="name" id="name" type="text" />

      <label for="mail">Your email address:</label>
      <input name="mail" id="mail" type="email" />

      <label for="subject">Subject:</label>
      <input name="subject" id="subject" type="text" />

      <label for="description">Your message:</label>
      <textarea name="description" id="description"></textarea>

      <input name="project" type="hidden" value="example-project" />
      <input name="url" id="url" type="text" />

      <input type="submit" value="Submit request" />
    </form>
    <p class="thanks">Thank you for getting in touch.</p>
  </body>
</html>
You can download the entire HTML page here: contact-us.html.
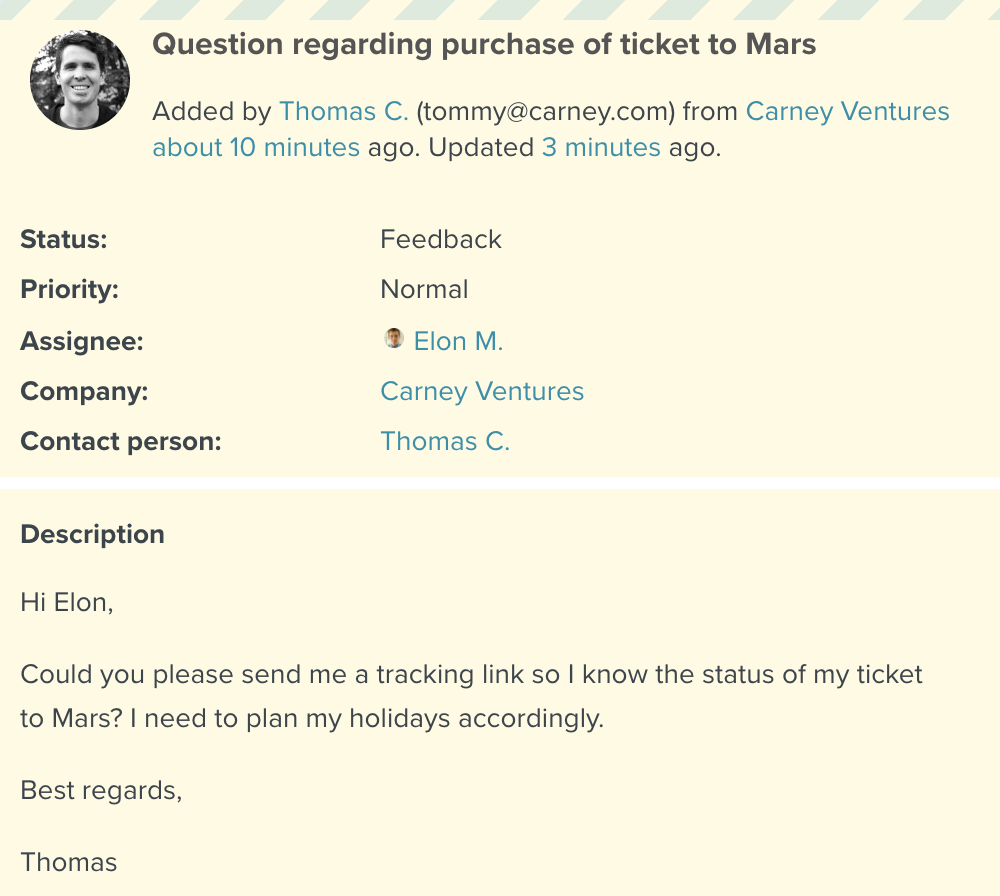
When someone fills out this form, the message will show up in Planio as an issue as you can see here:
That’s just one of the examples of how you can use the Redmine API at Planio to streamline your processes. You’ll find more examples and documentation, including how to add your own custom fields to your contact forms, in our Redmine API documentation.
Ohne Kreditkarte und unverbindlich. In nur 1 Minute angemeldet.