New Feature Walkthrough: Assigning an Issue to a User Group
In today's blog post we'll expand on one of Planio's new features as mentioned in Jan's Feature update! post; specifically, how to assign an issue to a user group. This functionality is especially useful for process or lifecycle-oriented environments, where project deliverables are the responsibility of teams or divisions.
Here's a walkthrough of how to create a user group and how to assign an issue to a group:
Step One: Enable Issue Assignment to Groups
For Administrator-level Users:
- Navigate to Administration → Settings → Issue Tracking.
- In the Allow issue assignment to groups field, select the check box.
- Click Save.

Step Two: Create and Configure a Group
For Administrator-level Users:
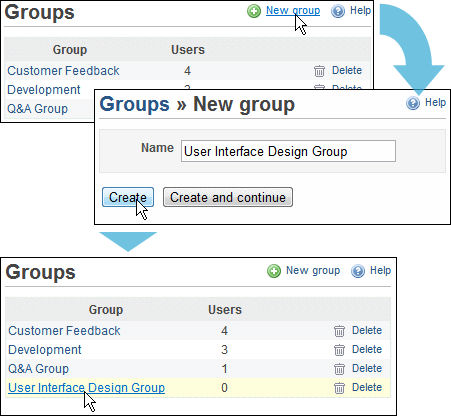
- Click Administration, then Groups.
- Click New group.
- In the Name field, enter the name of the new group.
- To create a new group and continue with the creation of an additional group, click Create and continue.
- In this example, we'll go ahead and click Create so that, after creation, we can proceed with adding users to our new group. In the graphic below, we named our new group "User Interface Design Group".

- On the Groups screen, under the Group column header, click the name of the new group.
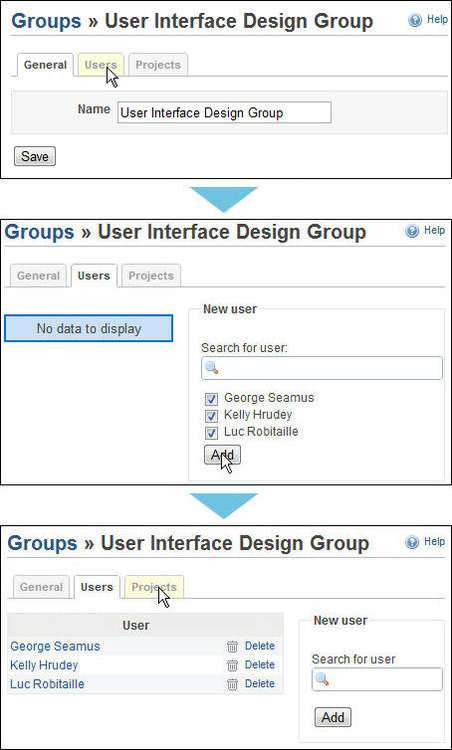
- The Group Settings interface appears featuring the group name under the General tab — if you want to change the name of the group, then modify the text and click Save.
- Click the Users tab—the Users tab displays a list of all users associated with the group.
- In the New user panel, select the check box(es) of users to add to the group and/or search for a user, if needed. In the graphic below, we added 3 users to the group.
- Click Add.
- The name of the users appear in the User table — click Delete to remove a user, if needed.

- Click the Projects tab—the Projects tab displays a list of all projects and their roles.
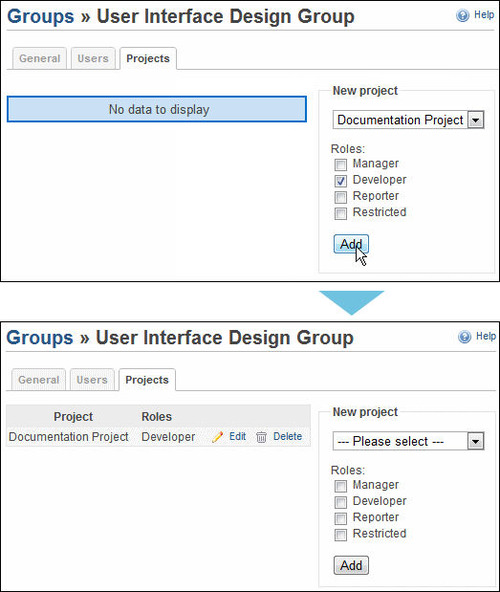
- In the New project panel, use the drop-down list to select a project to associate with the group.
- In the list of Roles, select the check box(es) of role(s) to be automatically assigned to members within the specified project. In the graphic below, we associated the project "Documentation Project" with the group and assigned the "Developer" role to all members of the user group.
- Click Add.
- The name of the project and role(s), if any, appear in the table — click Delete to remove project & role data or Edit to modify the settings.
- Note that users are granted permissions for all combined/assigned roles (i.e., roles/permissions associated with both a group and a project). You can view your roles by navigating to: <select project> → Settings → Members.

Step Three: Assign an Issue to a Group
- Create a new issue or edit an existing issue.
- If editing an issue, at the top of the Issue Details screen, click Update — the Update panel appears.
- In the Assignee field, select a group name.
- Proceed with creating/editing the issue.

Have you tried out the new issue assignment to group feature yet? If so, tell us about it! What other new features have you found useful? Remember to Like/Tweet if you enjoyed this walkthrough.
Brian is weathering the tail end of a typhoon in SE Asia and, when the wind isn't howling too loudly, is listening to the band Blue October and also to Enya... an eclectic combination!


