How to Create a Custom Field
Now that you've successfully added a company and some contacts (Keeping Good Company with Planio), let's check out a nifty Administrator-level function: Custom Fields.
Custom fields enable you to personalize Planio's functionality according to your organization's unique operating procedures. For example, if you use the PRINCE2 project management method, then "Business Case" may be a useful field when creating a new project. If you implement the Kanban approach, then a "Description of Incremental Change" text-field could be used in the Spent Time feature.
Your imagination is the limit when it comes to customizing the Planio experience. Planio supports up to 7 field formats (such as text, integer, list and date), and new fields can be added to 11 different functionalities (e.g., issues, spent time, users, groups, issue priorities).
In today's walkthrough we'll create a field for the New Contact feature using the fictional company Red Pendulum Pte Ltd (from the Keeping Good Company with Planio post). In this example, we will add a "Skype ID" field:
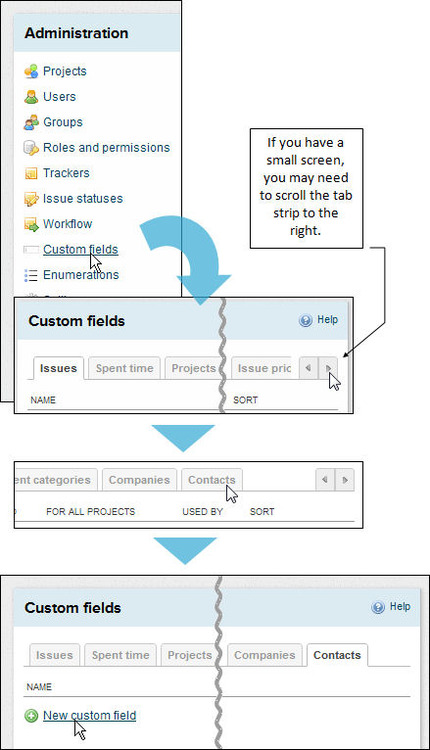
- Click Administration, then Custom fields.
- In the Custom Fields panel, click the Contacts tab.
- Click New custom field.
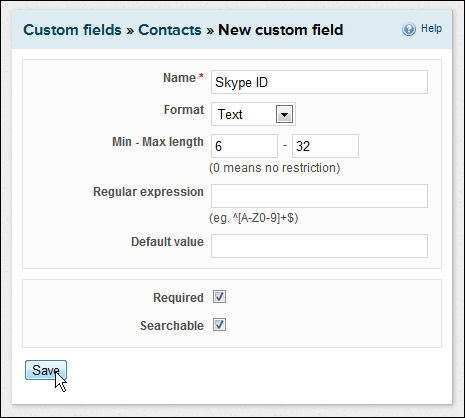
- The New Custom Fields table appears — there are a number of available options based on which option you select in the Format field.
- In the Name field, enter "Skype ID".
- In the Format field, select Text to create a short text field.
- In the Min - Max length field, enter a minimum of 6 and a maximum of 32 characters (this reflects Skype username length standards).
- If you would like to ensure a certain format for the values in your new field, you can specify a regular expression to use for validation. For the purposes of this exercise, though, the Regular expression field is not required.
- In the Default value field, enter default text for the field (usually left blank).
- In the Required field, select the check box to indicate that the field's completion is mandatory.
- In the Searchable field, select the check box to indicate that the data entered in the field will be searchable by Planio.
- Click Save.
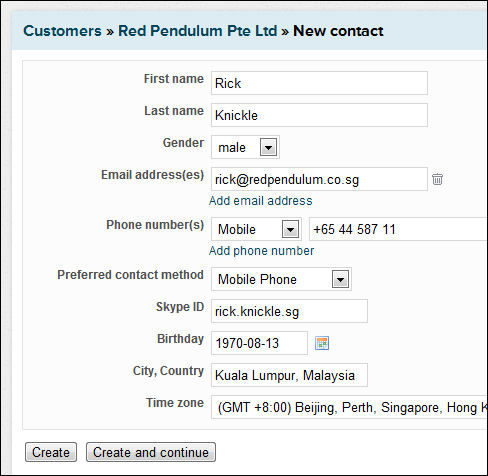
- When adding a new contact, the custom field will appear at the bottom of the field list (Hint: Use the sorting arrows in the Custom Fields panel to re-arrange your custom fields, as needed).
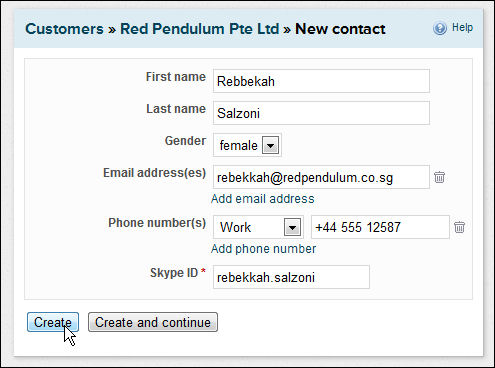
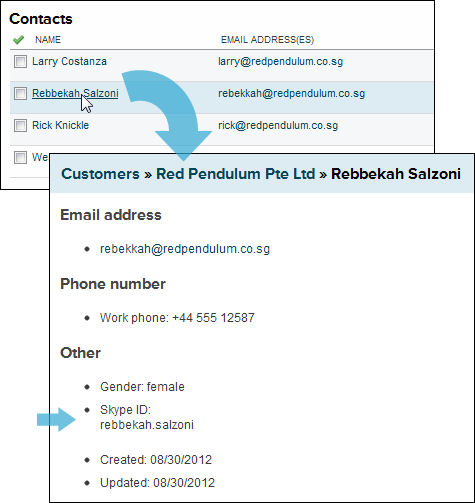
- After creation (i.e., click Create), the new contact's name appears in the Contacts list.
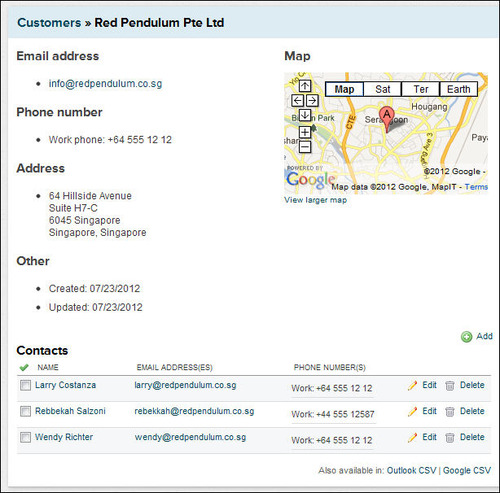
- Click on the contact's name to see the newly-added Skype ID field:
- As you can see from the graphic below, there are numerous ways to customize your Planio experience:

In future posts we'll explore some of the other formats used when creating custom fields. If this article was useful, please feel free to send us a Like/Tweet!
Brian, Planio's Blogger in Chief, is trying to master Angry Birds Space and failing miserably (he blames the gravity fields). When not sling-shotting birds, he enjoys long walks on the beach and eating clubhouse sandwiches... usually at the same time.


